Wednesday, June 15, 2011

JRapid Quick Tip 4: Easily Send Emails in Controller Actions

It’s a common requirement to send emails when certain action is performed in a web application. For example, send an email to a customer when his order has been confirmed.

This can be implemented in a few simple steps when using JRapid. All you need to do is import the Email template, configure your JRapid application to use an available outgoing email server and add a few lines of code.

Suppose we have a basic CustomerOrder entity that registers customer orders and has a property indicating if it has been confirmed. When this property is changed to “Confirmed”, an email should be sent to the corresponding customer notifying about this.

The entity definition:

<entity label="Customer Order" menu="Menu" name="CustomerOrder">
        <property display="primary" label="Customer" name="customer"/>
        <property display="primary" label="Email" name="email"/>
        <property label="Description" name="description" type="text"/>
        <property label="Confirmed" name="confirmed" type="boolean"/>
    </entity>


We add the SMTP configuration to the jrapid.properties files. In this case I’m using a Gmail account:


Import the Email template. Click on the Add-ons -> Import Template.


Select the Email template to import it.


This templates adds the Email entity that uses the Email stereotype. This adds the necessary methods for sending the message. Read more about email stereotype here

The last step is to add the Java code to the store method of the CustomerServices class to send the email. This is a simple implementation that is by no means production ready!


Now, when a user marks a customer order as confirmed and submits the changes, the web app sends an email notifying the customer.


Tuesday, June 7, 2011

jclouds: Java Open Source Library for managing Cloud Providers

jclouds announced the release of the 1.0.0 version of their open source library that helps developers get started in the cloud and reuse Java and Clojure development skills.

Their API currently provides developers with two abstractions: compute and blobstore. Compute helps bootstrap machines in the cloud. Blobstore helps manage key-value data.

Read their original post here: http://anyweight.blogspot.com/2011/06/jclouds-100-is-out.html

Monday, May 30, 2011

Apache Libcloud Graduates as a Top-Level Project

The Apache Software Foundation announced that Apache Libcloud has graduated from the Apache Incubator as a Top-Level Project (TLP).

Apache Libcloud is an Open Source library that provides a vendor-neutral interface to cloud provider APIs written in Python and Java. With one simple API, operations teams can write once and deploy anywhere, avoiding vendor lock-in.

The current Python version of Apache Libcloud includes backend drivers for more than twenty leading providers including Amazon EC2, Rackspace Cloud, GoGrid and Linode.

The Java version supports Amazon EC2, Eucalyptus, IBM Cloud and Rackspace.

Libcloud was originally started by the Cloudkick team, but has since grown into an independent free software project and now is a TLP.

Thursday, May 19, 2011

Add Minimize Functionality to JRapid Windows Using JQuery

Web applications generated using JRapid are, by default, single page applications that open floating windows with lists and forms. This means they behave and look much like a desktop native application.

In this post I’ll show you how to add minimize functionality to these windows. We’ll trigger this by double clicking on the window title. The window will be minimized to the bottom right corner of the browser window and will be restored by a single click on the docked element.


By adding custom JavaScript in the Main.js file as explained here, we will use the delegate method provided by JQuery to bind a function to the double click event on the window title.


This code creates a container for the minimized windows if it is not already present and adds new div elements for each minimized window after hiding them. It sets the label with the title of the window and attaches another function to the click event on this element that will remove the label from the minimized windows container and set the original window as visible again.

Some custom CSS has to be added too using the Main.css file as explained here. This is to provide some nice styling to the labels, but also to place the minimized windows container at the bottom right of the browser window.

A key concept here is the use of delegate. As described in the JQuery documentation, it attaches a handler to one or more events for all elements that match the selector, now or in the future, based on a specific set of root elements. This is what allows us to attach the handler function to windows that will be opened in the future.

Our Main.js looks like this:


And the Main.css includes this code:


Wednesday, May 11, 2011

JRapid Quick Tip 3: Adding Filters to Lists

Creating user-filterable listings is both incredibly useful in professional interfaces, and a snap to do with JRapid. Filters can be added to any listing and allow the user to limit the viewable records of particular entities by any number of their properties. Lists by default have three sections, the filter which if not specified will not be included, the view section displaying the particular records, and an “actionbar” section at the bottom allowing users to page through results and displaying default buttons and often custom actions.


JRapid services will automatically be created to select your records from the database and handle pagination of the results in the actionbar. When you create a filter, it will automatically create the back-end service to limit the results based on the parameter the user enters into the filter. JRapid delivers projects that adhere to the Model-View-Controller architecture.

These filters can quickly and easily be added to any entity in your project. All you have to do is right-click on the entity and select filter. You will then see a pop-up which will let you specify a name for this filter locally in your project, a label for the filter in the user interface and at the bottom a property of the entity to link to. Each entity can have as many or as few filters as you would like, and they support displays, so you have control over the screen layout of the individual filter controls.


Allowing users to limit their own search results is normally a fairly difficult task and something that you wind up duplicating time and time. Visit JRapid, try it out for yourself, and see how easy and quick a professional application can be to produce!


Try a sample app and see how filters work here.

Tuesday, May 10, 2011

JRapid Quick Tip 2:Include JRapid forms in your public website

Using JRapid you can get your web application up and running in an incredibly short amount of time. You can define the models (entities) that represent the information your app must manage and get the necessary lists, forms and panels generated. This is what, in many applications with a public and an administration front end, is referred as the “admin”. See previous post on generating admin with reverse engineering.

What if you want to reuse one of the generated forms to let the users in the public front end enter data? You can do this very easily using the JRapid JavaScript library.

Suppose we define an entity in our project to register visitor’s messages, in other words a Contact form. The entity looks like this:


The next function specifies the name of a JavaScript function to execute after the form is successfully submitted. This is used to show a message to the user.

In our project we have create a public folder in the WebContent where we’ll store all of our public front end files. To simplify things we’ll just create an index.html file to include the contact form. This is how the HTML looks like:


Note the inclusion of the JRapid JavaScript libraries and the usage of the jrapid.form() function. It takes the name of the entity as a parameter and a canvas, that is the DOM element in which the form will be included. It also takes the name of the module, which is always ‘Main’ if you have only one module. The last parameter, target, takes the value “replace” to indicate that the content of the canvas must be replaced by the form.

The resulting form included in the HTML page looks like this.


And after the form is submitted, the users sees the message.


From the admin of the web app, you can access the records created from the public page.


You can also include lists using the JRapid JavaScript library, but I'll leave this for a future quick tip.

Monday, May 9, 2011

JRapid Quick Tip 1: Link Lists in Panels

Entites defined in a JRapid project generate default forms and lists to allow end users to perform CRUD operations. These are HTML files that are stored in a folder in the WebContent public directory of your application. Panels are used to tie all these files together and offer the end user a way of accessing the different lists and forms without having to type the URL into their browser’s address bar.

Panels may include a generated menu bar that provides access to every entity’s list that defines a menu attribute value. The menu options are grouped according to the value of this attribute and order alphabetically. Panels can also make use of the menu attribute so that the user may jump from one panel to another.


Take a look at the code for the Sample CRM here to see this attribute in use.

Another very useful feature of Panels is that you may embed listings or forms into them. You can include as many listings as you need and use accordions to visually stack them.


This is done by using the accordeonitem and listing elements.

And last, the main purpose of this quick tip is to show how two listings can be linked. In the CRM sample app the Customers and Opportunities listings in the Index panel are linked together. When a customer is selected in the Customers listing, the Opportunities lists only the records that belong to this customer.


You can also embed forms into your panels and link them with listings. Use the form element for this.

You may also include raw HTML in your panels. If you need a higher level of customization, you can always create your own HTML files and implement your panels as needed.


Visit JRapid, sign up and give it a try!

Wednesday, May 4, 2011

jQuery 1.6 Released!

jQuery 1.6 was released yesterday and is available for you to use it in your web projects!
As usual, it includes a number of performance improvements. It also features an important rewrite of the Attribute module.

Make sure you read carefully the Breaking Changes section of the official  blog release post here as it describes some changes that may affect the behavior of your code.

This new release is available in the jQuery CDN:

A full changelog is available here: http://api.jquery.com/category/version/1.6/


Wednesday, April 27, 2011

Currency converter using Web Services and JRapid

In this post I’m going to show you how to use JRapid to quickly create a form that converts amounts between currencies using a web service that provides live updated conversion rates.

For this example we’ll be using a free currency conversion rates service provided by http://www.webservicex.net.

Create a new JRapid project and select the empty template.


We’ll start by creating an Enumset to define the available currencies and their codes. Click on the new Enumset button shown below. Enumsets are global definitions of constant values that can be used in properties. Read more here.


Fill in the dialog as follows.


This defines four currency names and their corresponding codes as expected by the rates web service.

Next, we’ll create a new transient entity called CurrencyConverter. Transient entities behave just like normal entities except that they are not persisted to a database table. JRapid generates the form, routes and services for them just like it would for a persistent entity, but it does not generate the code to persist them. The developer is responsible for implementing the business logic that will take care once the form is submitted. Read more here.


Click on the new Entity button.


Enter the following definition for the entity. Note the transient checkbox is selected on the right and that the fromCurrency and toCurrency properties are of type enum.


Once the entity is created go to the entity diagram and click on the fromCurrency property to edit its properties.


Select the Currency value in the Enumset field. This tells the fromCurrency property of type enum to show the values of the Currency enumset as options.


Now click on the toCurrency property to edit its properties and, again, select Currency in the Enumset field.


One more time, click on the toAmount property.


Check the readonly field.


Switch to the second tab, Value. Check the Dynamic Value at the bottom of the window. This will enable the configuration of a dynamic value, used for setting the value to a property based on data retrieved from the server side. You can read more about this here.

In short, you define what values of the entity form to send as parameters and an EL expression to be resolved in the server side. We’ll send fromAmount, fromCurrency and toCurrency as parameters for our example.


For the expression, we will just return an empty string. This will make JRapid generate all the logic and let us overwrite the method that is responsible for the expression evaluation in order to include our customized logic that makes use of the web service.


The trigger field defines when this remote service is going to be executed. If left blank, the default is always. This means the value will be calculated whenever one of the parameters’ values is changed.

This is how the form looks.


Now, we have to write the Java code to perform the currency conversion. Using the JRapid Eclipse plugin we can synchronize the project on the cloud to our local workspace and get our modifications uploaded instantly. Keep in mind that projects running on a Shared development environment do not allow you to upload modified Java code. Anyway, you can go on running the web app in a local development environment. Check this tutorial to get a detailed description on how to do this.

Back to Eclipse, we need to edit CurrencyConverterServices.java and override the getDynamicValueForToAmount method. The code included below is just a quick example and should not be used in real life apps.


package com.service1.services;

import javax.xml.parsers.DocumentBuilderFactory;
import org.w3c.dom.Document;
import org.w3c.dom.Node;
import org.w3c.dom.NodeList;

public class CurrencyConverterServices extends
  CurrencyConverterServicesAbstract {
 
 @Override
 public Object getDynamicValueForToAmount(String fromAmountParamId,
   String fromCurrencyParamId, String toCurrencyParamId) {
  double toAmount = 0;
  try {
   double fromAmount = Double.parseDouble(fromAmountParamId);
   
   String serviceUrl = "http://www.webservicex.net/CurrencyConvertor.asmx/ConversionRate?FromCurrency=" 
     + fromCurrencyParamId + "&ToCurrency=" + toCurrencyParamId;
   
   DocumentBuilderFactory factory = DocumentBuilderFactory.newInstance();
   factory.setNamespaceAware(false);
   Document responseDoc = factory.newDocumentBuilder().parse(serviceUrl);
  
   NodeList nodes = responseDoc.getElementsByTagName("double");
   Node rateNode = nodes.item(0);
   rateNode.getTextContent();
   double rate = Double.parseDouble(rateNode.getTextContent());
   toAmount = new Double(100 * fromAmount * rate).intValue() / 100.0;
    
  } catch (Exception e) {
   e.printStackTrace();
  }
  return toAmount;
 }
}

Note: the web service used in this example is taking a long time to respond at the time of writing.

You may now point your browser to the Convert Currency test and give it a try. Note how the value of the toAmount property is calculated every time you change any of the other three properties.


Through this tutorial we used the GUI provided by the JRapid Designer to create and customize our application, but all this was just another way to generate the actual definition of the application, the AML code. This is an an XML file that defines our business models. Read this about modeling with JRapid. But we could have switched to the source view and typed the definition by ourselves.


This is the code for the Enumset and Entity that we defined.


<entity label="Currency Converter" menu="Menu" name="CurrencyConverter" transient="transient">
        <property enumset="Currency" label="From Currency" name="fromCurrency" required="required" type="enum"/>
        <property label="From Amount" name="fromAmount" type="double"/>
        <property enumset="Currency" label="To Currency" name="toCurrency" type="enum"/>
        <property label="To Amount" name="toAmount" readonly="readonly" type="double">
            <dynamicvalue expr="''">
                <param name="fromAmountParam" type="double" value="fromAmount"/>
                <param name="fromCurrencyParam" type="string" value="fromCurrency"/>
                <param name="toCurrencyParam" type="string" value="toCurrency"/>
            </dynamicvalue>
        </property>
    </entity>

    <enumset name="Currency">
        <enum value="EUR">Euro</enum>
        <enum value="USD">US Dollar</enum>
        <enum value="CNY">Chinese Yuan</enum>
        <enum value="BRL">Brazilian Real</enum>
    </enumset>

Tuesday, April 26, 2011

Instant Java Web App Admin Generation with JRapid’s Reverse Engineering

Most web applications have many more model objects exposed on the backend than they do on the front end. Implementing interfaces for all those models is redundant and a waste of time when all you need is CRUD functionality that’s smart enough to handle all your model associations.


JRapid’s reverse engineering process addresses this in a quick and painless way, producing an amazing production ready UI that can be further customized to match the detailed requirements of your web app.


Some of the features you’ll get out of this simple process are:
  • AJAX lists and forms interface for creating, updating, and deleting records
  • RESTful XML API support
  • CSS styling and theming support
  • Full source code and WAR download
You can see the web app that we'll get out of this process here.


The reverse engineering process is still under development and is marked as a beta feature in the menu option that starts the wizard. It basically scans the tables present in a database schema which you may provide by entering a public’s schema connection data or by pasting a SQL creation script. It then creates the necessary entities and properties to manage the database. The process creates the tables in the database development schema created with every JRapid project, and executes any insert statement present in the script.

For this example I’ll be using the BIRT Sample Database. The schema is for Classic Models, a retailer of scale models of classic cars. The database contains typical business data such as customers, orders, order line items, products and so on. The original schema does not include foreign keys, which were added in the script used for this article as they are used by the process to produce a more detailed application.

Download the modified schema creation script from here as we’ll be using it in the next steps. You may see the ER diagram here.

Let’s start by creating an empty JRapid project. You need to be registered as a JRapid user to do this. If you’re not already registered, do so at www.jrapid.com. Projects of up to 20 entities are free, and the sample database has only eight tables.

Once in the JRapid Designer, make sure you update your project’s version to, at least, the 1.0nb80. This is the latest nightly build available at the time of writing. This guarantees certain bug fixes to the reverse engineering process.

Go to the Create menu and select DB Reverse Engineering (Beta).


This will open the Reverse Engineering wizard. Select Paste SQL Dump File in the Discover Mode field and paste the contents of the creation script into the Dump data field. 

Note that your creation script may contain data inserts to include sample data to be imported into your produced app.


After the form is submitted the process generates all the entities and properties corresponding to the tables and columns in the SQL script. As a second step, a new form is shown allowing for further customization.


This forms lists all the entities created and details the properties included, along with the assigned name and label, and the database column name.

It also specifies if the property is an entity-type property that establishes a relationship with another entity. This is where the foreign keys in the original database are used as important information to define this attribute. The last column, Display, indicates which properties are going to be shown as columns in the lists generated for each entity.


Take a look at the image above that shows how the Employees entity is customized. The process defines the relationships with the Offices and Employees entities. It also makes the property corresponding to the column marked as primary key a visible column by default. For this table, the column is employeenumber, but we’ll add the lastName and firstName properties as well.

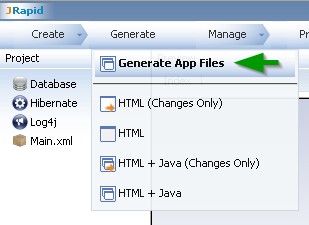
Click OK to submit the customizations. We must run a code generation to make sure these changes are done. Go to the Generate menu and click on the Generate App files option.


You may use the Organize button to tidy up the entity diagram and see what the process generated for the DB schema.


Our app is ready for us to try it. Click on the Preview menu and select Preview Index.


This will open the main panel for your web app on a new browser tab.


The web app already looks great and has all the functionalities needed to manage your database tables, but we can introduce some tweaks to improve the user experience.

Go back to the JRapid Designer browser tab. Click on the Index panel in the Entity Diagram.


Add the following columns to the panel.


Switch to the Content tab of this same form and change the Header and Footer to better suit our app.


Now refresh the tab were the Panel was opened and take a look at the lists included for easier access.


One more tip: go to the entity diagram and edit each of the date type properties: orderdate, requiredate and shippdate.


For each of these, select jdatepicker as the widget.


This will show a datepicker control when the user makes focus on any of these form fields.


As a last tweak we’ll make an important change to our Orders entity. The process created two entities: Orders and Orderdetails. With some knowledge of the business model and the database design it’s easy to see that an Orders record has many Orderdetails. It is a typical multi-line pattern.

In the Entity diagram we can put our mouse pointer over the add button of the Orders entity and select property to create a new property.


Fill in the form as follows.


Then click OK to submit the changes and a code generation will be executed. If you go back to the application Panel and double click on an Order record you’ll see that the form that opens now shows all the related Orderlines. These can be edited inline, new lines can be added or existing deleted.


This article shows how easy is to obtain a complete management Java web application from an existing database and how simple is to tweak it using JRapid. You can then download the full source code for your application, or a WAR file, and deploy it in your own servers. You can also publish your application to JRapid's production environment, although this is still a beta feature.


Once your app is ready for deployment, you may change the database connection data to point to your original schema and use your new web app to manage it. You can see the final app running here.


Friday, April 15, 2011

Must have tools for working with Amazon AWS

For Java developers working on the AWS Amazon Cloud infrastructure.


S3 Organizer
Great Firefox plug-in that allows uploading and downloading of files to and from Amazon S3 with a friendly GUI. You can modify files Access Control Policies and create time limited URLs.

Another Firefox plug-in that provides basic Amazon EC2 management features. Currently, the web-based AWS Management Console has outgrown this in features.

Firefox plug-in that implements an AWS Route53 GUI client.

Open source plug-in for the Eclipse IDE that makes it easier for developers to develop, debug, and deploy Java applications using AWS. Features: AWS SDK for Java, AWS Elastic Beanstalk Deployment, Amazon Simple DB Management and Amazon EC2 Management.

For Windows users, PuTTY is a free implementation of Telnet and SSH. This will allow you to connect remotely to you EC2 instances.

This is an open source free SFTP client and FTP client for Windows. Its main function is safe copying of files between a local and a remote computer.

What other tools do you find useful for working with AWS?

Wednesday, April 13, 2011

Using JQuery input plug-ins in your JRapid App

When using code generation tools, the extensibility and customization issues are always a concern. JRapid generates a complete user interface with special widgets for each property data type and it even offers more options to import as add-ons.

But what about when you want to use your own widgets or leverage the vast amount of JQuery options available out there? Luckily, I found out that this is very easy to accomplish with little effort. I’ll walk you through the process.

For this example, we’ll use the alphanumeric plug-in by Paulo P. Marinas.

Most JQuery plug-ins aimed at helping users with data input work with text input elements. They are easily applied to a field by just selecting the element and calling a function like this:

$(“#my_input”).pluginname();


JRapid helps with the creation of widgets for your project. Go to the Add-ons -> Create add-on menu. 


Select “Widget” for the type field and complete the dialog as shown in the next image. Just enter a name for the widget by which you’ll make reference to it in your JRapid project and the name of the function that initializes the JQuery plug-in. As explained in the alphanumeric plug-in documentation, this is “alphanumeric”.


Next, use the JRapid Eclipse plug-in to get your project into your local workspace. Go to the project’s file tree and look for the WebContent/jrapid-runtime/extras/widget-alphanumeric folder that the create add-on wizard created. Inside this folder create a “js” folder. Download the alphanumeric files from here, unpack and copy jquery.alphanumeric.pack.js to the js folder you’ve just created.


Finally, edit your app definition file, Main.xml. Look for the config element and in there for this element:


<usewidget jquery="alphanumeric" name="alphanumeric"/>


Modify it so that it looks like this:


   <usescript location="../jrapid-runtime/extras/widget-alphanumeric/js/jquery.alphanumeric.pack.js"/>


You’re ready to use your widget on any property. Just add the widget=”alphanumeric” attribute. For example:

<entity label="Product" menu="Menu" name="Product"> 
       <property display="primary" label="Name" name="name" widget="alphanumeric" /> 
       <property label="Price" name="price" type="double" /> 
</entity>

The generated form for the Product entity looks like the following image.


That will prevent users form entering characters other than alphanumeric to the product name.
You can read more about creating widgets in JRapid's Widget Add-on documentation.